-

-


Follow Us
-

Doom: The Dark Ages Chapter 5, “The Holy City of Aratum,” is an enormous dragon-riding stage that’s teeming with nine secrets and four collectibles and therefore is among the most rewarding and discovery-based stages in the game. Players drop their cyber-dragon to secret landing areas to discover hidden gold chests, weapon skins, rubies, life sigils, codex entries, and even a collectible toy.
The highlight of the level is the Layover challenge, where the players are required to find two secret dragon landing points to acquire extra gold, rubies, and the bonus Nightmare Pulverizer skin.
From outdoor aerial combat to intricate puzzles involving keycards, pressure plates, and environmental traps, “The Holy City of Aratum” is an excellent blend of smooth movement, rewardingly concealed secrets, and bountifully story-infused collectibles to satisfy completionists and casual finders alike.
Level Overview

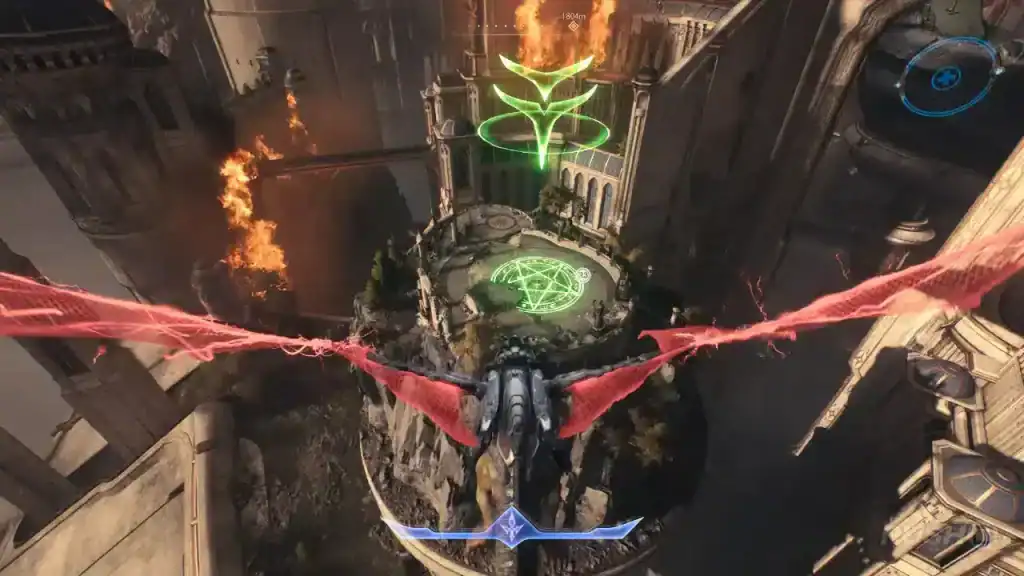
The Holy City of Aratum is the first fully open dragon-riding chapter in Doom: The Dark Ages, breaking from the linear Atlan mission design until now. You fly over the devastated cityscape on your dragon, then dismount and stroll through large courtyards, sunken wells, and enormous ship decks.
The non-linear mission design allows you to finish objectives in close to any order, but as per usual in Doom: The Dark Ages, diligent exploration is required to uncover all nine secrets and four exclusive collectibles.
Dragon Landing Zone Secrets
1. Gold Chest (Secret 1)
- Where: Secret dragon landing zone in a round tower to your lower left when you enter.
- How to Unlock: Defeat the Titan demon guarding the tower to open up the zone.
- Reward: Defeat the demons in the plaza, including a mini-boss, to obtain a maximum health Demonic Essence, and continue in the direction below the plaza for the chest.
2. Nightmare Pulverizer Skin (Secret)
- Location: Bottom of the circular base of the second secret dragon landing spot on the Hell Carrier.
- How to Unlock: Swim under the ship, slay two Titans, and swim through the breach in the outside wall to get into the outer ring of the building.
- Reward: The secret Nightmare Pulverizer skin is unlocked by discovering it. This also finishes the Layover challenge for reward gold and rubies.
3. Ruby (Secret 2)
- Prerequisite: Red keycard (located inside a well that is entered after solving a shield-and-valve puzzle).
- How to Unlock: Stand on a green pressure plate to uncover a platform, toss your shield to demolish locks, dive to drain water, pick up the keycard, and go back to the main tower.
- Reward: Pick up the ruby from a statue inside the tower.
Keycard and Environmental Secrets
4. Gold Chest (Secret 3)
- Location: Second ship’s tiny courtyard, which can be accessed by climbing down a local well beside the Sentinel Shrine.
- Reward: Supplies, gold, and a gold chest.
5. Life Sigil (Secret 4)
- Prerequisite: Blue keycard, found on a cliff after making your way through a graveyard.
- How to Unlock: Open a walled section behind the Sentinel Shrine with the keycard and collect the life sigil, raising maximum health.
Codex Entries and Collectibles
6. Holy City of Aratum Codex Entry (Collectible)
- Where: Third ship’s main building, near scaffolding and breakable drawbridge chain.
- How to Unlock: Drop the drawbridge, shield-bash a box into position, ascend the makeshift staircase, and move into the alcove to read the codex.
7. Ruby (Secret 5)
- Where: At the back of the codex entry room, beyond an unlocked gate in the same building.
- How to Unlock: Shoot your shield at a chandelier to activate a pressure plate, which will open the ruby gate permanently.
8. Serrat Toy (Collectible)
- Location: Secret tunnel off the bridge to the third Hell Carrier.
- How to Unlock: Jump off the battlements into a secret side room, clear an ambush, and then climb the stairs to find the Serrat toy.
Final Hell Carrier Secrets
9. Gold Chest (Secret 6)
- Location: Within the gory arena of the third ship, reachable through the left staircase.
- Reward: There is a hidden gold chest during a demon battle.
10. Deag Loric Codex Entry (Collectible)
- Location: Lowermost level of the ship, beyond flesh tunnels on the right.
- How to Unlock: Turn back from the last drop-in point before destroying the ship to collect the Deag Loric codex entry.
Final Thoughts for Completionists
- Map Knowledge: Identify Titan silhouettes marking concealed landing sites on the minimap. Even on other missions in Doom: The Dark Ages, knowing the map is just as important as playing it!
- Shield Mastery: The majority of secrets entail precise shield throws. Master lock shots, chandeliers, and shatterable chains.
- Keycard Tracking: Always search wells and branch corridors for keycards; missing them early can deny necessary secrets.
- Challenge Synergy: Completing Layover and Countercult challenges gives not only collectibles, but also a gold and ruby bonus towards building upgrades. These recur often through Doom: The Dark Ages, so make sure to do as many as you can!
- Revisit Areas: Since the level is non-linear, return to earlier ships after obtaining keycards for previously inaccessible secrets.
By following this guide, you’ll unearth every secret nook of “The Holy City of Aratum,” amass all four collectibles, and master the dragon-riding mechanics to fully conquer Doom: The Dark Ages’ most expansive chapter.
For more guides and news on Doom: The Dark Ages, check out here!
More must-reads:
- Tiger Woods stepping away from golf to 'seek treatment' in wake of DUI arrest
- Cowboys' Jerry Jones reveals 'long-term plans' for George Pickens; Brian Schottenheimer comments on situation
- The 'Active 30-point NBA games leaders' quiz
Breaking News
Trending News


Customize Your Newsletter
 +
+
Get the latest news and rumors, customized to your favorite sports and teams. Emailed daily. Always free!

PRIVACY POLICY COOKIE POLICY CONTACT US
ABOUT YARDBARKER TERMS OF SERVICE
By using this site, you agree to our Terms of Service and Privacy Policy.
This site is for entertainment purposes only.
There is no gambling offered on this site.
Gambling Problem? Call 1-800-Gambler.