-

-


Follow Us
-


As you progress through the “Rush the Gate” main mission in Borderlands 4, you’ll come face-to-face with Idolator Sol, one of the Timekeeper’s formidable commanders. This multi-phase boss fight concludes the Fadefields story arc and serves as a major test of your skills, demanding sharp reflexes, spatial awareness, and a firm grasp of its unique mechanics. Unlike previous encounters, Sol’s fight introduces new layers of complexity that can easily overwhelm an unprepared Vault Hunter.
This guide provides a step-by-step walkthrough on how to beat Idolator Sol in Borderlands 4. We will break down his attack patterns, explain the critical locust rod mechanic, and offer strategies for managing the arena hazards in each phase of the fight.
Understanding the Idolator Sol Fight
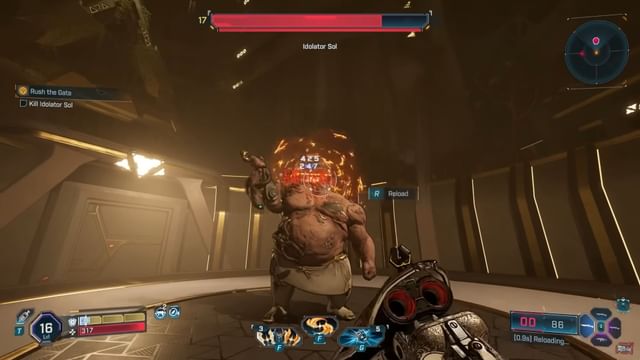
Idolator Sol is protected by a thick layer of bio-armor, making him immune to all damage at the start of the encounter. To defeat him, you must first find a way to strip this armor and expose his vulnerable flesh underneath. The entire battle revolves around this central mechanic, which evolves and becomes more challenging as the fight progresses.
Sol has three flesh health bars, all of which are weak to Incendiary (fire) damage. Bringing fire-based weapons and grenades will significantly speed up the damage phases of this fight.
Phase 1: Breaking the Armor
The first phase is a duel against Sol in his fully armored state. Your primary goal is to create an opening by using his own weapon against him. During this phase, you must learn to recognize his attacks to survive long enough to make him vulnerable.
Idolator Sol Phase 1 Attacks
- Armor Toss: Sol rips off a piece of his bio-armor and hurls it at you. This projectile is slow-moving, so a quick dash or sprint to the side is all you need to avoid it.
- Energy Laser: He will fire a continuous laser beam from his hand that tracks your movement. Do not try to dodge this at the last second; you must keep running horizontally to stay ahead of the beam until the attack ends.
- Locust Rods: This is the key to winning the fight. Sol shoots several rods into the air that land in a straight line, marked by colored lights on the ground. Most of these rods are red and cannot be interacted with, but one will be green.
- Shield Bash & Sword Spin: After you make him vulnerable, Sol may re-form his remaining armor into a shield for a charging ram or a giant sword for a spinning slash. For the bash, dash to his unarmed side. For the spin, create distance or use a double jump to avoid the wide arc.
How to Damage Idolator Sol
You cannot damage Sol until you use his locust rod attack against him. When he launches the rods, avoid the red landing zones and locate the green one. After the green rod lands and sticks into the ground, it becomes throwable. Use your grapple to grab the green locust rod and immediately throw it back at him.
A successful hit will instantly shatter the bio-armor in the area you hit, revealing his flesh health bars. This is your window to deal damage. Aim for the exposed area, especially his head, for critical hits, and unleash your strongest Incendiary weapons. The armor will eventually regenerate, forcing you to repeat the process.
Phase 2: The Arena Becomes a Weapon
After you deplete two of Idolator Sol’s health bars, the fight intensifies dramatically. He will begin using new, more dangerous attacks that utilize the entire arena, forcing you to stay constantly aware of your positioning.
Idolator Sol Phase 2 Attacks
- Locust Bio-Weapon Rain: Sol will cause locusts to rain down from above, covering most of the arena. A single bright spot will appear on the ground, marking a safe zone. This spot moves, so you must be ready to sprint to the next safe area to avoid continuous damage.
- Ground-Shattering Slams: The floor will glow with green energy, tracing lines that will soon erupt with damaging locust energy. Stay off the glowing lines to avoid taking heavy damage.
- Multiple Locust Rod Waves: Sol now fires several waves of red rods before finally launching the single green rod you need. Be patient and keep moving to avoid the landing zones while you wait for your opportunity.
- Locust Fog: A damaging fog will begin to close in on the outer edges of the arena, shrinking the available fighting space. Be careful not to backpedal into it while dodging his attacks.
Strategy for Phase 2
Despite the new hazards, your core objective remains the same: grab a green locust rod and throw it at Sol to make him vulnerable. However, you must now do this while navigating a much more dangerous environment.
Prioritize survival above all else. During the locust rain, focus solely on staying within the moving safe zone. When the floor begins to glow, adjust your position immediately. Spatial awareness is critical, as you need to dodge Sol’s standard attacks while also avoiding the environmental hazards.
The minions that spawn throughout the fight become even more important in this phase. They are your primary source for securing a Second Wind if you go down. It’s a good strategy to lower their health when you have a moment, making them an easy kill if you find yourself in trouble.
Continue the cycle of waiting for the green locust rod, making Sol vulnerable, and unleashing your fire attacks on his exposed flesh. With the added pressure of the arena’s hazards, your damage windows may be shorter, so make every shot count.
Once you deplete his final health bar, Idolator Sol will fall. Collect his bolt and your hard-earned loot, including a chance at Legendary items like the “Goremaster” shotgun or a class-specific mod.
More must-reads:
- Insider shares notable update on Shedeur Sanders' status with Browns
- South Carolina's Dawn Staley reacts after tense exchange with UConn's Geno Auriemma
- The 'NCAA men's basketball champions' quiz
Breaking News
Trending News


Customize Your Newsletter
 +
+
Get the latest news and rumors, customized to your favorite sports and teams. Emailed daily. Always free!

PRIVACY POLICY COOKIE POLICY CONTACT US
ABOUT YARDBARKER TERMS OF SERVICE
By using this site, you agree to our Terms of Service and Privacy Policy.
This site is for entertainment purposes only.
There is no gambling offered on this site.
Gambling Problem? Call 1-800-Gambler.