-

-


Follow Us
-

 On Facebook
 On Flipboard


The Refraction Railway, the Limbus Company’s true endgame content, has finally opened a fresh line. After the absence of a new set of fights in Season 6, Project Moon promised big, but have they delivered?
Let’s take a deep dive, discussing its central mechanics, scariest threats, and the best Refraction Railway Line 6 build for every fight.
Refraction Railway Line 6 Central Mechanics
Leaning into Season 7’s focus on the Past, Present and Future, Line 6 shuffles around some central Railway mechanics. Realistically, you only actually need two full teams. Like other Railways, Line 6 limits repeat lineups, but only in specific fights.
For example, you can’t use the team you cleared Section 02 with in Section 03, but they will become available again in Section 04. Whichever team you use in Section 03 can’t be selected in Section 04 either. Think of it as your teams having a one fight cooldown before reuse.
Section 05, the final boss, doesn’t limit any team selection. Instead, it rewards you for thinking ahead, allowing you to retain the HP and SP state of the IDs you utilized in Section 01 in Section 05. All in all, this Line is all about planning, so let’s pick this whole thing apart and prepare!
Section 01 – Weighing of Robes
Refraction Railway Line 6 starts odd immediately, throwing you into a ‘battle’ against the Pupa form of Section 05’s final boss, the Butterfly of Entangled Lives.
Fun fact! Refraction Railway bosses are typically based on Battlepass EGOs we usually wouldn’t get to see the Abnormalities for. Since we didn’t get a Line last season, Hong Lu’s Battlepass Abno makes an appearance in Section 02!
Back to the Butterfly, you’ll go through a three turn series where you can trade blows with the boss and build up a bit of SP. The boss is unkillable, and will use the skill ‘The Quickening’ to forcibly end the fight at turn 3.
When turn 3 begins, the Pupa also slots in three attacks: “Entangled Life – Regression”, “Entangled Life – Manifestation”, and “Entangled Life – Advent”. Clashing with these attacks will inflict bosses later down the line with bonus weaknesses based on your skill’s Attack Type and Sin Affinity. “Regression” affects Section 02’s fights, “Manifestation” affects Section 03’s fights, and “Advent” affects Section 04’s.
For example, clashing with Regression using Middle Nursefather Outis’s “Don’t Let Somethin’ Like This Break You!” will afflict every Section 02 enemy with an extra vulnerability to Blunt and Envy-based attacks. If you go into the line knowing what you’ll want to use, you can ensure quicker clears than anyone trying to just win rate.
For a hint towards our recommended teams, I went into Section 01 clashing like this…
| Regression | Blunt Envy |
| Manifestation | Any Slash, preferably Gluttony |
| Advent | Blunt Wrath |
And here is our lineup, relying on the House of Spiders to open and finishing it up with burn. We’ll go over the game plan later, just know that any units you retain between Sections 01 and 05 will keep their HP and SP, so focus on allowing important units like BoHoS Ryoshu and the nursefathers to win clashes and build up sanity.
Once “The Quickening” is over, the battle ends, and you’re whisked away into our first proper fight, Section 02.
Section 02 – Tarnishing

If Refraction Railway has a lesson it wants to teach, it’s the importance of endurance. Every battle, from the very beginning, will require you to work to minimize incoming damage. With this in mind, it’s very important to make sure you’ve collected a few healing EGOs.
For the best Refraction Railway Line 6 EGOs, Faust’s “Fluid Sac” is a fantastic pick with both HP and SP healing, especially in teams that can easily fuel its Envy and Gloom cost. Gregor’s “Garden of Thorns” also does wonders to keep the team on its feet. A personal favorite, and part of the reason we’re running a burn package in 3 of the 4 fights, is Rodion’s “Indicant’s Trial”.
Here is our Refraction Railway Line 6 Section 02 Team

Phase 1 – Refracted Yinglong
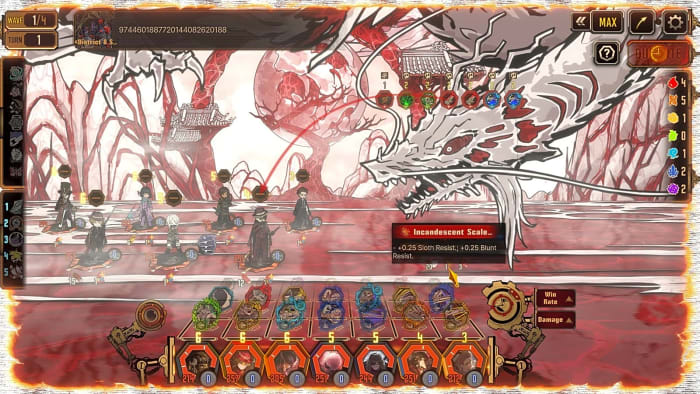
Back to the battle, Section 02 opens up with a very cinematic fight against Yinglong, a giant dragon that focuses on inflicting Rupture. He opens the battle with a giant 7,000 HP shield, acting as the progress bar for phase 1.
While any attack that gets through will deal decent damage, there are a few priority skills you need to focus on. Let’s go through them one by one, in terms of priority.
- The Descending Pin – The source of a lot of potential pain, both for you and Yinglong. “The Descending Pin” is a single coin single that gains Coin Power based on Yinglong’s stacks of Flower-burying Pins and any Bind or Paralyze on the sinners. Failing to win a clash against the skill will see Yingling spawn a Flower-burying Pin at the start of the next turn and follow up with a devastating attack. If a Sinner manages to win the clash, they’ll redirect the Pin, dealing a fixed 300 damage to Yinglong’s head. Clashing with ‘Descending Pin’ every turn will stop Yinglong from utilizing his strongest attacks, and slowly chip down Yinglong’s shield. To ensure you can win these clashes, make sure to meet our next skill head on.
- Wrath of the Inverted Scale – Yinglong’s Clashable Guard, Wrath of the Inverted Scale only goes off if you meet it, and that can make it very easy to ignore. If you can, clashing with Wrath of the Inverted Scale will forcibly consume all Flower-burying Pin on Yinglong, weakening the “Descending Pin”. The only danger comes from the AOE SP damage Yinglong threatens thanks to the Attack Weight. If you can, use someone not caught by the blast to target “Descending Pin” to ensure the win.
-
Draconic Vortex – A three-coin Gloom Skill, “Draconic Vortex” is an AOE attack that grants a special buff if successfully clashed with. This buff, Capricious Mercy, grants 3 bonus speed and 2 Clash Power to whoever holds it, until an attack hits them. If you manage to hold onto it, Capricious Mercy makes it much easier to clash with “Descending Pin.”
Once you destroy Yinglong’s shield, the fight moves on to Phase 2. Yinglong will consume the party, forcing you into a battle with a full Heishou team of Envy Pecctaulum, alongside Yinglong’s core.
Phase 2 – Refracted Hongyu, the Crimson Jade
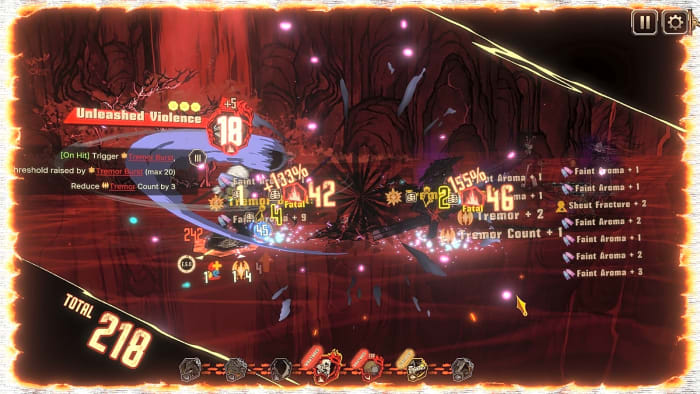
Like the Sinner battles in LCB Check-Up, the next phase of Section 02 matches you with a full 12 set of Envy Pecctaulum in the form of a full Rupture Heishou team. This leads to a hell of a scramble, with the Heishou’s massive speed and Lord Hong Lu opening with a “Tears of the Tarnished Blood” EGO pop.
The best way to ensure you survive the next few turns is to stagger Lord Lu as fast as possible, before he activates “Tears of the Tarnished Blood.” To ensure this, activate the Durante effect “Pigritia”, which halves all enemies’ speed values.
Mau Branch Adept Faust will use her turn to set up her Assist Defense, ensuring she’ll interrupt up to 2 attempts to attack Lord Lu. With his low stagger threshold, it’ll be easy enough to stop him from using the EGO, especially if you use a Blunt skill. Our team has plenty, so slow him down and prepare for turn 2.
On turn 2, Hongyu itself will attempt to use a massive bomb skill on every unit on the field. Stopping this is your new priority, and its 5 stagger thresholds make that easy. Throw 2-3 decent strength attacks against it to guarantee its death, while clashing with any incoming Heishou attacks.
Now that he’s staggered focus on killing Lord Lu. As long as he’s alive, newly entering members of the Heishou will get free Skill 3s off. Take him out to deny that extra pressure. The Hongyu’s death will give everyone on your team a 1 time shield that will block all damage from the next incoming attack.
This will make it easy enough to plow through the rest of the Heishou. Be careful of their lowered SP, as they could corrode and let off random EGO attacks indiscriminately. Finish off the Heishou, and you’ll transition to Phase 3.
Phase 3 – Wounded Yinglong

With the False Heishou gone and the Hongyu shattered, Yinglong still needs to be finished off, even if he’s in a heavily wounded state. The fight plays like Phase 1, with a few notable changes.
First, Yinglong can only be killed once his Flower-burying Wedge is broken. This part, denoted by the spine symbol, is vulnerable during two specific new attacks.
- The Dragon’s Wedge – A Clashable Guard that grants Yinglong extra stacks of Flower-burying Wedge. This effect doesn’t go off if Yinglong loses the clash, so alongside “The Descending Pin” make this attack your top priority.
- Tides Born of Dragon’s Tears – Every three or so turns, Yinglong will attempt to use “Tides Born of Dragon’s Tears”, a massive bomb skill amplified by it’s stacks of Flower-burying Wedge. This is why keeping the Wedge down is so important. If you manage to win the Clash, Yinglong is afflicted with 3 Fragile, opening him up for a massive swing turn.
Keep on the Wedge whenever you can, and once you chip it to zero, Yinglong will fall. Once he does, you’ll enter a room with part of the Butterfly of Entangled Lives, sporting a 333 HP shield. Breaking the shield will allow you to disable part of the final boss’s passives for a phase, a crucial choice.
The shield takes double damage from EGOs, so pop a few if your team is a little worse for wear. For this first choice, I would recommend the first option, canceling out the clause that applies burn to Sinners who attack the Butterfly.
The final battle is all about conditionals, so keeping your burn as low as possible will do wonders. With that finished, you’ve cleared Refraction Railway Line 6 Section 02!
Section 03 – Heart of Innocence, Face of Things

Now for a far more gimmicky fight! Section 03 only has two battles, and the first is more of a puzzle than anything.
The Heishou are a very solid pick for this fight, both for their extra attacks going into Phase 1, and the unique weaknesses of the boss in Phase 2. We’re basically mirroring the enemy team from Section 02!
A quick look at the best Refraction Railway Line 6 Section 03 Build!

Phase 1 – Refracted Will You Play?
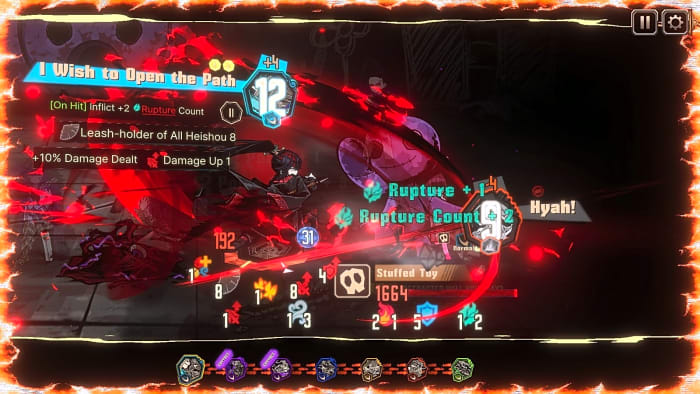
You’re up against another Abnormality, a small girl called “Will You Play?” and her squad of Envy Pecctaulum in the form of the 6 Middle Identities we have.
Before the battle begins, you’ll be greeted with a choice event, where the Abnormality Sunset Wayfarer will offer a choice of two buffs: survivability or damage. This effect with buff every unit on the field, so it’s important to think carefully based on your team’s weaknesses.
For our Heishou lineup, a team with some notably squishy members, the bonus HP and removal of a stagger threshold granted by the survivability buff are too good to pass up. This way, you’ll be able to stay on the offensive far more easily.
The goal of the fight is beating Will You Play, and she’s fully covered as long as the Middle are alive. At the start of the battle, she’ll mark a Middle member as “It“. Once she does, every Envy Pecctaulum will fill their skill slots with counters, ensuring some serious payback if you swing at the wrong unit.
You have 3 turns to kill the unit marked It. Should you fail to, every Sinner takes 40% of their HP as damage, and one immediately corrodes, an easy wipe. Your goal is to cut through each unit marked It while defending yourself from Will You Play.
Every turn, Will You Play will throw out 3 attacks. 2 of them are randomly selected between “Play With Me!”, “Hyah!”, and “Do You Like Dolls?”. Prioritize beating these, and remember who you tasked with doing so.
Win or lose, the Sinner that clashed will be afflicted with 2 Power Down for the next turn. One of these sinners should then clash with “I’ll Go Fer Scissors. How ‘Bout You?” on the next turn, maintaining a rhythm where healthy sinners focus on killing It as a designated few keep Will You Play entertained.
Losing the Clash against “I’ll Go Fer Scissors. How ‘Bout You?” is our goal, as the attack deals a whopping +300% damage if it goes unopposed or loses the Clash. “I’ll Go Fer Scissors. How ‘Bout You?” gains 20 Clash Power if matching a unit with Power Down, hence the repeated setup.
If “I’ll Go Fer Scissors. How ‘Bout You?” wins, the attack is canceled and replaced with “You Win…”, a buff that grants the loser 2 Offense Level Up and heals 2 Sinners with the lowest HP on the team.
Once you clear all the Envy Pecctaulum, Will You Play will attempt to end the fight with “Let’s Play Together Forever~!”, a massive attack that can be softened by stacking Defensive Skills on whoever isn’t clashing.
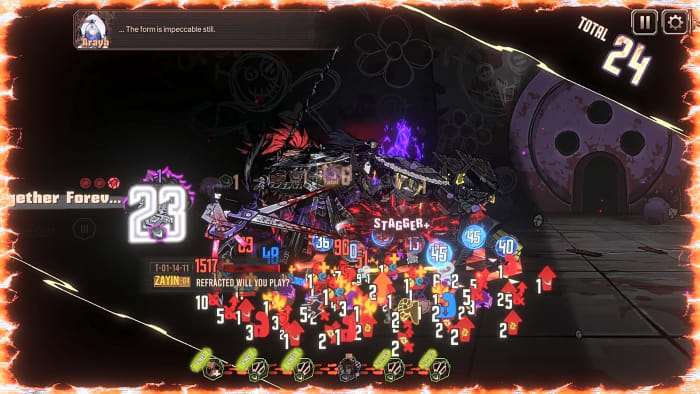
Should you survive, Will You Play staggers, and the fight is an easy cleanup. Breaking the Stuffed Toy part clear this Phase, so keep at it until she decides to throw in the towel. Our next battle is against a very familiar face.
Phase 2 – Refracted Hohenheim

This is essentially the same battle against Hohenheim that takes place during the end of his Fathoms in the LCB Checkup Intervallo. The challenge here comes from bigger numbers, and the fact you’re likely coming into the battle wounded.
Despite the curbed start, there are plenty of ways to prepare. Hohenheim only has 4 attacks, most of which are nothing particularly exciting. The scary part of the battle comes at turn 3, where Hohenheim fills his Skill Slots with blocks and prepares a massive attack.
“Trigger Extinction Sequence” is Hohenheim’s nuke skill, launched on Turn 4 and every turn that Hohenheim ends with 30 or more Poise count. Despite the scary name and massive potential damage, you can easily curb “Extinction Sequence”‘s damage.
The attack has a clause guaranteeing a critical hit if Hohenheim’s shield isn’t broken on the turn he fully blocks. However, if you do deal any damage over his shield’s value by the end of the turn, “Trigger Extinction Sequence” deals -80% damage once it goes off, whether it wins or loses the Clash.
This is why we brought the Heishou for this Section, as Hohenheim’s shield takes double damage from Rupture, the Heishou Pack’s primary status.
Every time “Trigger Extinction Sequence” goes off, you’ll be met with a choice event allowing you to negate one of Hohenheim’s passives. If you’re going quick, you’ll only need to negate one, but we’ll lay them out in priority order in case you get multiple chances.

- Disable the Shield passive Defense Mechanism – Hohenheim’s shield is the only thing stopping you from gutting his best source of damage. Weakening Defense Mechanism not only lowers the size of the shield Hohenheim gets, but also increases the bonus Rupture damage he takes. An easy first pick.
- Disable the Sanity passive Confirmation Bias – Since he technically isn’t an Abnormality, Hohenheim still relies on SP to strengthen his rolls. Confirmation Bias allows Hohenheim to drain SP from the sinners with the highest, while keeping his own SP from falling below 15. With this gone, you’ll lose less Sanity and get to push him into Panicking. Worth considering as a first pick if you aren’t running Rupture.
- Disable the Poise Passive Adaptation – While this mechanic is Hohenheim’s central way of increasing his damage, weakening it doesn’t do much. He’ll deal a bit less and stop weakening the Sinners, but his debuffs aren’t typically enough to stop you from piercing his shield. The least impactful.
Once Hohenheim falls, you’ll get another audience with the Butterfly, this time representing The Present. Your choice here will weaken the final battle’s Poise stance, and you should target the first effect. Not losing Poise will effectively give the Butterfly of Entangled Lives limitless Crit damage, on top of guaranteed Crits.
This effect, combined with the other stances, is an easy way to get demolished. Without it, you have more time to weaken the Butterfly, and a light at the end of the tunnel should you eat a bad hit.
Section 04 – Tangled Knots, Drowning Desire, Blind Folly

Now for the longest battle of Refraction Railway Line 6, three back-to-back battles against the Nursefathers Shimoi, Callisto, and Rien. Functioning like their encounters in Canto 9, the challenge here is in starting strong and keeping your momentum up until the very end.
For these battles, we ran the full House of Spiders package we currently have, with Hornet Mersault and Firefist Gregor as Burn units ready to cross the finish line with an empowered BoHoS Ryoshu.
A quick look at our Refraction Railway Line 6 Section 04 build.

With this lineup, we’ll have ample access and use to a plethora of healing EGOs, crucial to keeping healthy in this dragout fight. Let’s start from the top!
Phase 1 – Refracted Pinky Nursefather Shiomi Yoru

We open with arguably the toughest fight of the lot, Shiomi can constantly output damage, especially if you’re not careful. This battle is more or less a race, as Shiomi stacks Bladetrail across the team and attempts to single out individuals.
As the battle progresses, she’ll target more and more people with “Destinated Opponent”, an attack that can only be clashed with by the target. These skills will apply a certain amount of damage to Shiomi if beaten, and beating each in a turn will inflict her with Fragile.
Winning these clashes can be difficult, which is where “Silent Regard” comes in. These weak attacks grant extra SP when beaten, and will lower Shiomi’s Final Power for the turn. Meeting these is your key to keeping her rolls low, which is very important.
Shiomi also has the passive “I Shall Give You Some Quarter”, halving her damage to any enemy who is using a Defensive Skill. With this in mind, we can minimize even her most damaging attacks, while remembering to keep the party healed with liberal EGO usage.
Shiomi’s actual HP is covered by a shield, and like Yinglong, popping it is your main priority. Once it falls, Shiomi will stagger before reapplying it. Pop it again to stagger her and shatter it fully, opening her up to proper damage.
The scariest damage numbers coming from strong AOE unbreakable Skills like “Formless Cut:, culminating after her shield has been broken twice. Once it does, her pattern will shift.

With this new lineup, Shiomi will give 2 opportunities to lower a Sinner’s built-up Bladetrail, via the skill “Phantom Step”. Beating it in a Clash halves the winner’s current Bladetrail Stack, crucial thanks to her incoming nuke, “Uttermost Rend Space – String Severance”.
“Uttermost Rend Space – String Severance” hits the entire party, popping their Bladetrail for percent HP damage. Your best bet is to meet it with your strongest Clashing skill, be that an EGO or an empowered “Rend Space” of your own. Anyone who isn’t lowering their Bladetrail or meeting the attack should use their Defensive Skill, minimizing the incoming damage thanks to “I Shall Give You Some Quarter”.
Use these methods to chip down Shiomi, and you’ll quickly be on the way to the next Phase.
Phase 2 – Refracted Ring Duo Callisto and Albina

Callisto and Albina fight exactly as they did in Canto 9, and act as the easier middle stop before our final fight. They don’t have much to point out, other than a reminder about the important of Assist Defense.
Both Albina and Callisto have powerful attacks that can be weakened before going off by attacking them with unopposed attacks. These attacks will be intercepted by the other Ring member, as long as they have a stack of Assist Defense remaining.
Your best bet is to send your fastest units at the Assisting enemy, as their Assist Defense will be consumed at a rate of one per Clash.
Otherwise, the fight is remarkably simple. Focus down Albina first to leave Callisto vulnerable, and remember to free anyone trapped by his “Installation Art no. 3: Improvised Ribcage”. The bone that keeps the Sinner stunned after the attack can easily be caught in Skills with higher Attack Weight, so try to nail it in the splash zone while you whittle down Callisto.
Phase 3 – Refracted Index Nursefather Rien
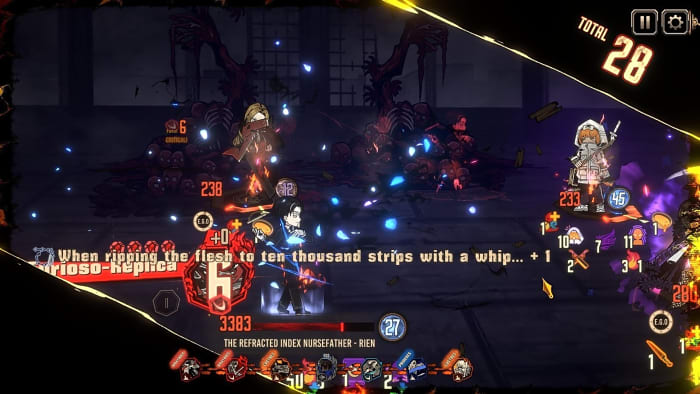
Now for a rematch against Canto 9’s final boss, Rien. By this point, you’ve probably suffered a few losses. Luckily the Sunset Wayfarer returns with the same option as Section 03, offering a choice of damage or survivability.
After the draining sequence of battles, the HP increase is too hard to pass up, giving you a bit more breathing room while you prepare to match Rien.
Just like his normal fight, Rien focuses on fulfilling the Prescripts granted to him by his pager. Your goal is to ensure he fails his Prescripts by intercepting his targets and beating his non Unbreakable attacks.
Every time Rien gets an attack through, he’ll gain a stack of Procuration [Hermes], up to 9. When he gains 9, or on the 4th turn of combat, whichever comes first, Rien will unleash “Furioso [Replica]”. This nuke inflicts massive amounts of Bleed, Bind, and Fragile, while also hitting hard itself.
Luckily, the attack can be weakened by forcing Rien to stack Karmic Consequence, a debuff he gains when he fails to fulfill his Prescript or attack his desired target. Keep him off his game and keep the Sinners healthy until you drain his HP to 55%, where Rien forcibly ends the turn.

Rien’s mask falls away, and he cleanses all effects other than the ones he started the battle with. Now, every 9 attacks or 4 turns that pass, he’ll throw out another “Furioso”, each stronger than the last.
The first is “Furioso [Cresendo]”, a stronger version of “Furioso” that can be weakened just the same. As the battle reaches its zenith, Rien will try to close it with “Furioso[Lacrimosa-Crescendo]”, an even harder-hitting variant. This is your last hurdle, clear it and Rien’s stacking Karmic Consequence will have lowered his Clash Power and defenses enough for you to finish off.
After Rien is the final form of the Butterfly, the Future. From here, you can weaken a portion of the final boss’s Bleed stance, and disabling the first or third parts is equally valid. The third segment healing the Butterfly whenever anyone takes Bleed damage is especially harmful if you’re running a bleed team, so consider which sounds more harmful to your specific lineup. I went with option 1.
Section 05 – Refracted Butterfly of Entangled Lives::Imago

Now for our final battle, the Butterfly of Entangled Lives is here, alongside visions of its own Past, Present, and Future. These backrow enemies don’t actually attack, but are crucial to weakening the Butterfly.
First off, for our team, run the same units you opened Section 01 with to maintain their SP, allowing you to start the fight ahead. We ran the House of Spiders lineup again, complete with BoHoS Ryoshu and the finishing Burn package.
This is our final and best Refraction Railway Line 6 build. Abusing the best IDs currently in Limbus for superior damage and endurance.
I’ve said it half a dozen times, but any healing you can eke out here is crucial, so equip any EGOs you have that keep the Sinners healthy. Our friend the Sunset Wayfarer will make one last offer, and as before, I can’t recommend the extra HP enough. Now that you’re prepared, let’s go over exactly how to clip the wings off this Butterfly.
The Butterfly of Entangled Lives itself is incredibly healthy, opening the fight with a whopping 25 THOUSAND HP. You’ll need to maximize your damage in any way you can, which is where the Past, Present, and Future Illusions come in.
While unkillable, each Illusion standing behind the Butterfly is directly tied to one of its active buffs, named Past, Present, and Future, respectively. The Butterfly will shift to whatever passive has the highest value, deactivating the others. Every turn the Butterfly gains some of the deactivated buffs, and certain attacks can stack more.
For every coin that hits one of the Illusions, it will lose a stack of its buff. Whenever the lead buff changes, the Butterfly gains a stack of Temporal Disjunction, increasing its incoming damage by 15%. Once this effect reaches its max at 10 stacks, the Butterfly is also permanently afflicted with 5 Fragile.
All in all, that’s a 200% damage vulnerability you can stack on the Butterfly, and acts as the key to bringing it down. The Butterfly also has 5 separate stagger thresholds, and looping these staggers is the final step towards victory.
Open the battle by clashing where you can, using all free slots to attack whichever Illusion is providing the highest stacked passive. Try to keep the effects as low as possible, as the Butterfly gains 10 stacks of each when it reaches both 66% and 33% of its max HP. When any of the passive reach multiples of 10, they grant higher and higher scaling buffs, which can quickly lead to the wipe.
Each of the Butterfly’s most damaging Skills deal bonus damage based on the stacks it currently has, another huge reason to keep them down. It’s worth letting a few of its weaker attacks make it through if you can keep Past, Present, and Future totals down, remember that.
Once you manage to get the Butterfly to 10 Temporal Disjunction, focus on meeting whatever the closest stagger threshold is. When that opening presents itself, open fire. Make sure not to forget about the Illusions, and use the free turns to keep them low for when you can’t Clash.
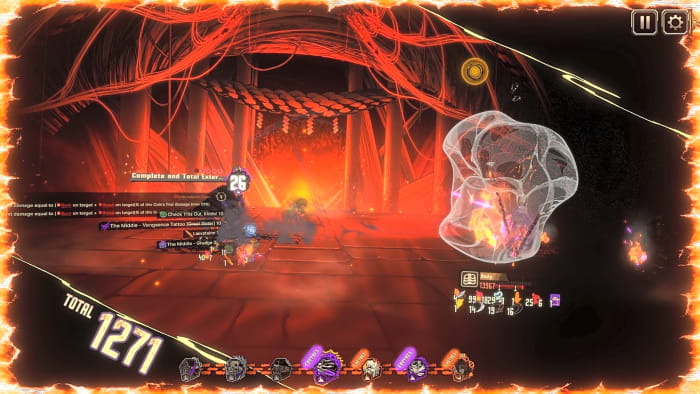
The battle will drag on, and your final members will need to be able to stick around as long as possible. A few notable interactions, counter Defensive Skills like those brought by the Middle don’t trigger Bleed, so they can be used to avoid higher stacks for a turn or two.
Since he’ll be one of our closers, Meursault’s Regret EGO from Walpurgisnacht has a perfect effect, cleansing him of two debuffs with each use. With this, you can immediately clear all stacks of Bleed and Burn on Meursault, allowing him to avoid damage and clash easier.
As long as you plan out your turns and keep each effect low enough, you’ll be able to take down this overgrown bug. And just like that, you’ll have cleared Refraction Railway Line 6! Make sure to share your clear counts below, and if you’re missing any of the new units, remember the Refraction Railway allows Support units! I’ve been lucky enough to snag most of the Season 7 roster, so use my friend code:F617869470 if you’re missing any!
More must-reads:
- One Lakers decision may have cost them LeBron James
- Commanders adding secondary depth with signing of veteran defensive back
- The 'Most MLB All-Star Games' quiz
Breaking News
Trending News








Customize Your Newsletter
 +
+




Get the latest news and rumors, customized to your favorite sports and teams. Emailed daily. Always free!
PRIVACY POLICY COOKIE POLICY CONTACT US
ABOUT YARDBARKER TERMS OF SERVICE


By using this site, you agree to our Terms of Service and Privacy Policy.
This site is for entertainment purposes only.
There is no gambling offered on this site.
Gambling Problem? Call 1-800-Gambler.